In this guide, we'll walk you through the concept of postbacks, why they are crucial for your affiliate marketing efforts, and how to set them up on the OnClickA platform.
Welcome to OnClickA Academy!
As an advertiser looking to make the most of your affiliate marketing campaigns on OnClickA's self-serve ad network, precise tracking of conversions is vital. One powerful tool that enables accurate tracking is the Postback URL. In this guide, we'll walk you through the concept of postbacks, why they are crucial for your affiliate marketing efforts, and how to set them up on the OnClickA platform.
1. What is Postback and Why Do You Need It?
Postback, also known as server-to-server tracking, is a method used by advertisers like you to track conversions in real-time. It is a simple URL sent from your server to the OnClickA server, informing us of a successful conversion. This information includes details such as the offer ID, affiliate ID, transaction ID, and payout amount.
The importance of using postbacks lies in accurate conversion attribution. By implementing postbacks, you can understand which traffic sources, campaigns, and creatives are driving the most conversions. This data empowers you to optimize your campaigns for better results and make informed decisions to boost your ROI.
2. How Does Postback Work?
When a user interacts with your campaign and completes the desired action, such as signing up or making a purchase, the conversion is recorded on your server. Your server then sends the postback URL to the OnClickA server, containing all the necessary conversion details.

Upon receiving the postback URL, the OnClickA server logs the conversion and attributes it to the appropriate traffic source, campaign, and affiliate ID. This information is vital for calculating commissions accurately and understanding the performance of your affiliate marketing efforts on our platform.
3. Features of Setting Postback
Setting up postback on the OnClickA self-serve ad network is a simple process.
Postback is a link that needs to be inserted into the tracker in the “Traffic Source” section. It acts as an intermediate link between our platform and the tracker to send conversions from to OnClickA. There are three tokens in the postback - campaign_id, Click_id, and payout. The first two are mandatory for the system to accept the conversion (Click_id) and know which campaign to send it to (campaign_id), while payout is an optional token that allows the user to pass their revenue to our campaigns.
It is crucial that our tokens correspond to the tokens used by the tracker for Click_id, campaign_id, etc. In the postback, there are token pairings, for example, click_id=[CLICK_ID], but it can also be click_id={external_id} (which is the most common scenario). The key point is that when setting up the postback, it should contain our first token in this pairing (click_id, campaign_id, and payout), and the second token (often external_id/subid/var, etc.) should also be present in the link that the client is promoting. However, there is a difference in the order of tokens between the postback and the link. In the postback, our token comes first, for example: click_id={external_id}, whereas in the link, our token comes second: for example: external_id=[CLICK_ID].
4. How to Set Postback at OnClickA
Step 1: Access Your Tracker
Log in to your tracker platform and navigate to the "Traffic Source" or similar section where you can set up the postback. We will attach screenshots from the Keitaro tracker as an example:

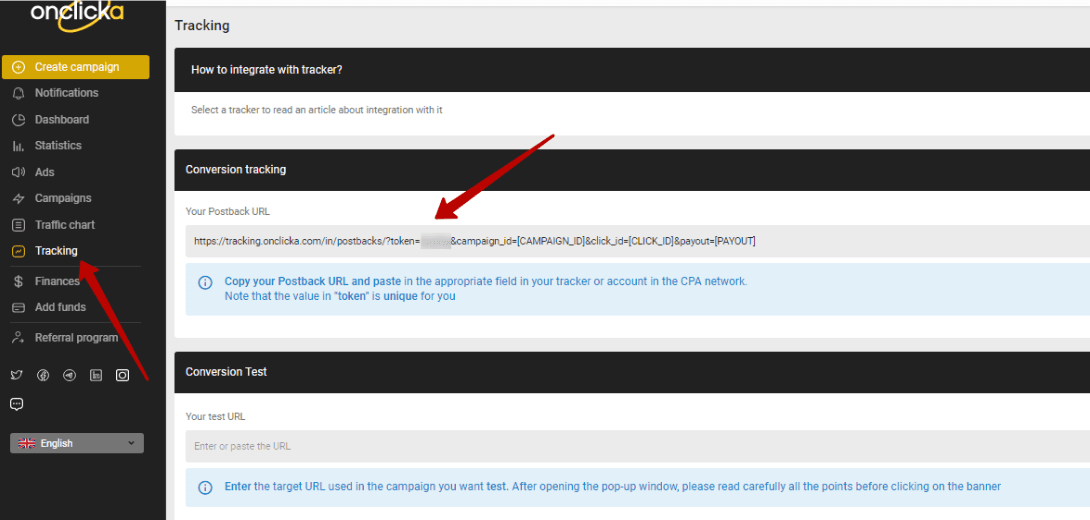
Step 2: Obtain Your Postback Link
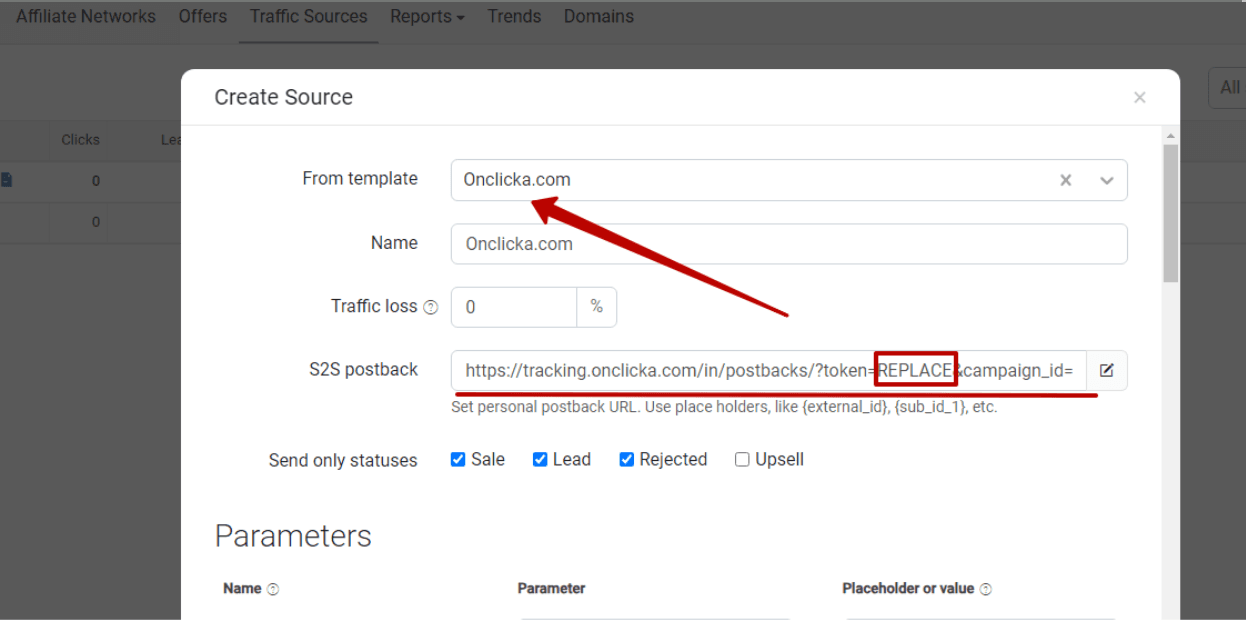
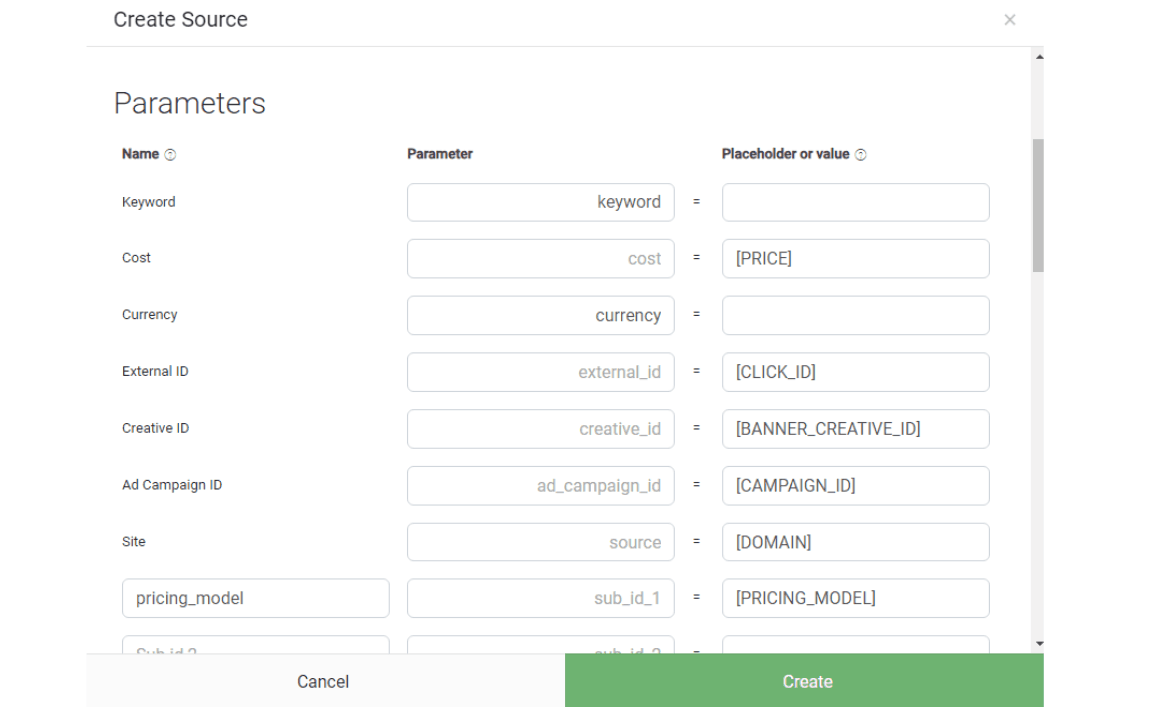
Postback needs to be inserted into your tracker to facilitate conversion tracking. Client can get a postback link from OnClickA (pic.1) but it can also be obtained from templates in the tracker where the client can select OnClicka (pic.2). The only difference is that:
- if you take the link from the "Tracking" section in OnClicka personal cabinet, you will only need to replace only the click_id and campaign_id tokens with the tracker parameters;
- if you choose the link from ready-made templates, you will need to insert the tokens you need instead of, for example, the word "REPLACE", and you will also need to add the unique token of your postback, which you can find in the link in your personal cabinet
Picture 1:
Picture 2:
Here is an example of a postback link:
https://tracking.onclicka.com/in/postbacks/?token=KKK999&campaign_id=[CAMPAIGN_ID]&click_id=[CLICK_ID]&payout=[PAYOUT]
Here the unique token is token=KKKK999
Step 3: Understand the Tokens
In the postback link, there are three tokens - campaign_id, Click_id, and payout. The first two tokens, campaign_id and Click_id, are mandatory for successful conversion tracking, while the payout token is optional and allows you to pass revenue data.
Step 4: Map the Tokens in Your Tracker
Map the tokens in your tracker to ensure they correspond to the ones used by OnClickA. Our default example is click_id=[CLICK_ID], but other variations are possible, for example click_id={external_id} is most commonly used.
Step 5: Arrange the Tokens in the Postback Link
When setting up the postback, make sure to place our token (click_id, campaign_id, and payout) first in the token pairing, and the second tracker tokens (external_id/subid/var, etc.) should be placed second.

Step 6: Insert the Postback Link
In the "Traffic Source" section of your tracker, insert a postback link obtained from OnClickA or from ready-made tracker templates. This link acts as a bridge between your tracker and our platform to track conversions effectively.
Step 7: Verify and Test
Before finalizing the setup, review the postback link to make sure it contains the correct tokens and parameters, and make sure the tokens in the link and postback match.
Example:
Ads link:
https://onclicka.com/ASD?external_id=[CLICK_ID]&subid1=[CAMPAIGN_ID]
Postback Link:
https://tracking.onclicka.com/in/postbacks/?token=KKK999&campaign_id={subid1}&click_id={external_id}&payout=[PAYOUT]
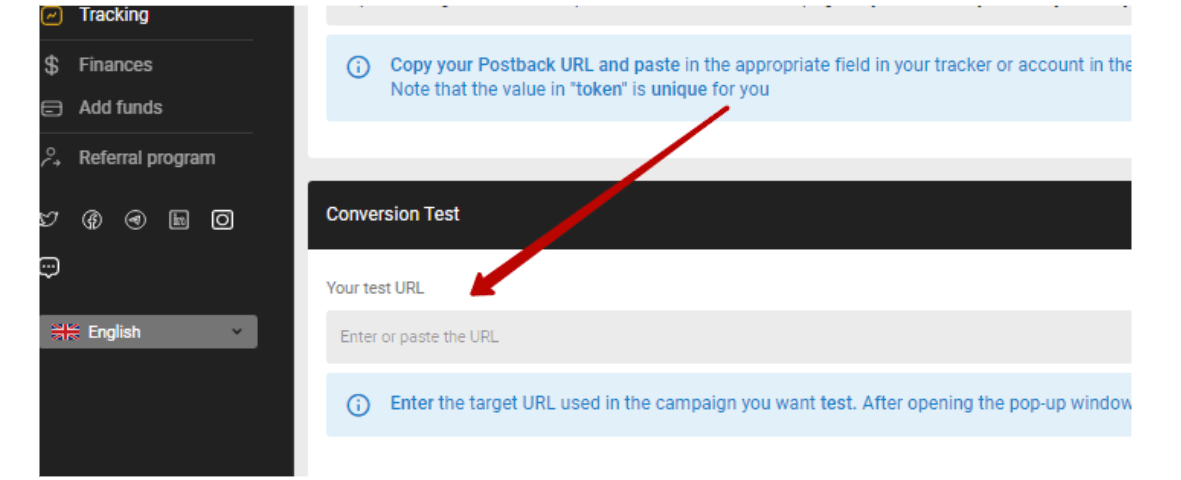
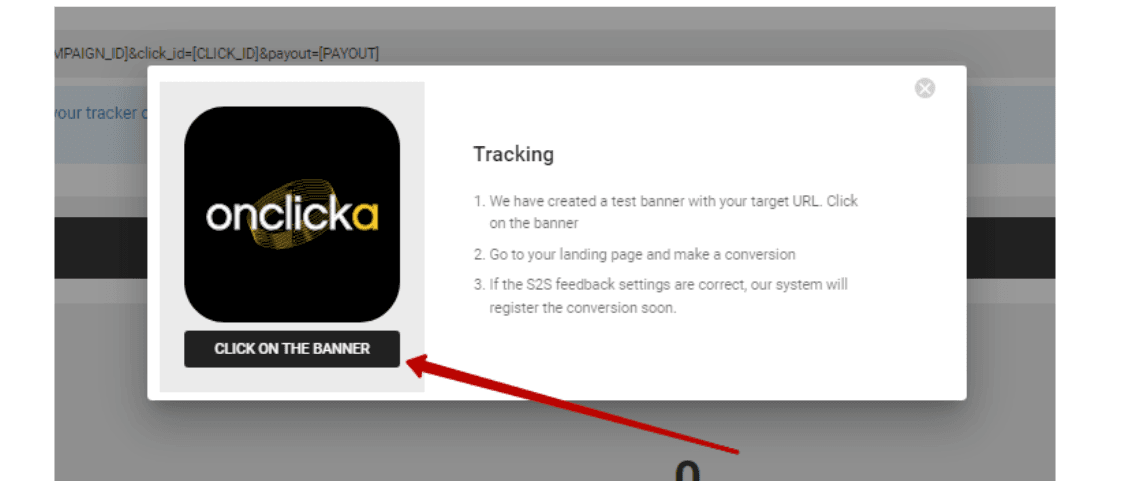
After that, do a test in the Tracking section of your Onclicka account to make sure conversions are accurately tracked and reflected in OnClickA. In this section you will need to insert the link you want to promote (pic.1), click on the banner (pic.2) and do a conversion action on your site or an affiliate's site, then it will appear in the same section that you have gotten 1 conversion.
Picture 1:
Picture 2:
By following these steps, you'll successfully set up postback for tracking with OnClickA and ensure that your conversions are effectively recorded and measured for your campaigns.
Conclusion:
When setting up postbacks at OnClickA, you gain valuable insights into your campaign's performance, enabling you to optimize your efforts for maximum conversions and revenue. Take advantage of this powerful tracking tool to supercharge your affiliate marketing success with OnClickA. Happy advertising!