Want to run offers with popunder traffic but not sure where to start? This guide shows you the full setup from registration to optimization. You’ll see how to link CrakRevenue with OnClickA, choose the right offers, and launch campaigns that bring results.
1. Preparation: registration and account linking
The first step is to set up your accounts. You’ll need access to both CrakRevenue and OnClickA before you can launch a campaign.
CrakRevenue
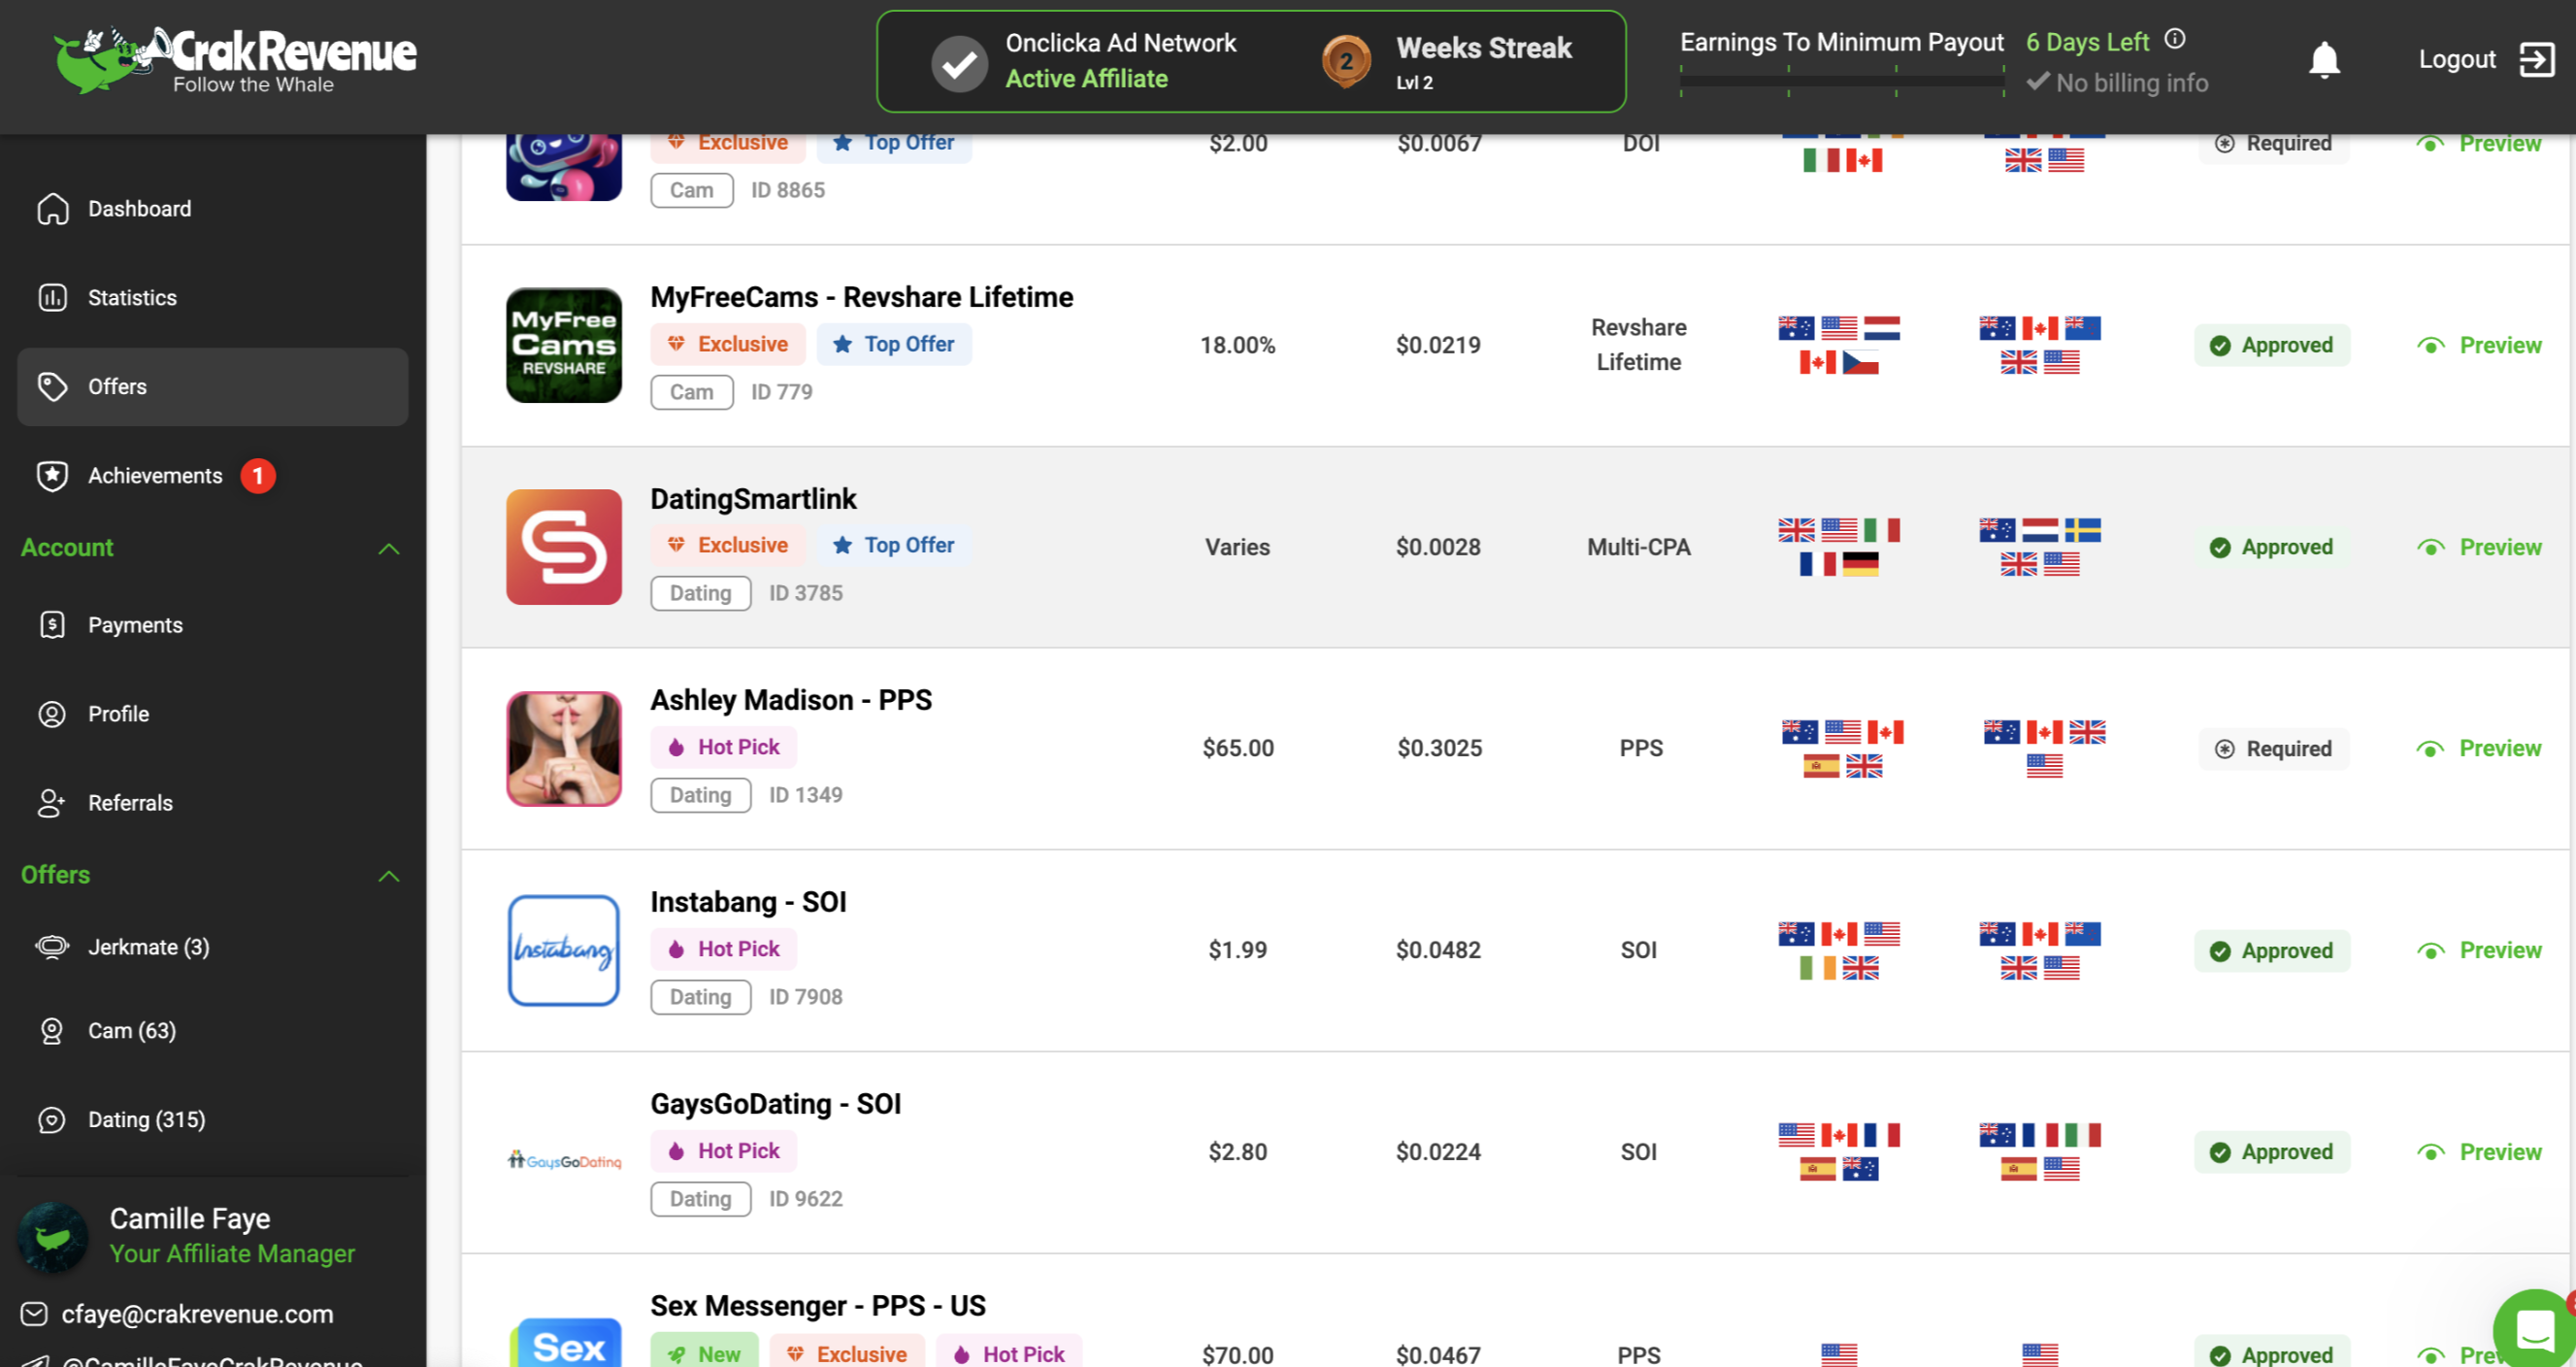
Go to affiliates.crakrevenue.com and sign up. Take a few minutes to fill out your profile carefully. CrakRevenue checks every detail, and without a complete profile you won’t get access to the offers. Once your account is approved, open the Offers tab. There you’ll find more than 500 offers and smartlinks in different niches.
OnClickA
Next, create an account at app.onclicka.com. After that, fund your balance. We recommend a deposit of $300 or more, but you can start with less. This amount will be enough for a proper test and to collect initial data.
2. Choosing an offer or smartlink
Once your accounts are ready, the next step is to decide what exactly you want to promote. You usually have two main options: a smartlink or a specific offer. Both can work, but they suit different situations.
Option 1: Smartlink
A smartlink is the easiest way to start. It automatically sends each user to an offer that fits their GEO and device. This saves time and works well if you don’t yet know which countries or devices will convert best. It’s also useful when you want a quick test of your traffic quality or when you’re not ready to pick landing pages yourself.
Pros: stable EPC, automatic routing by GEO/device, fewer rejections.
Cons: less control, some clicks may be sent to weaker offers.
Option 2: Specific offer
If you already have some statistics or you have an understanding of which GEOs and devices work for you, go with a specific offer. This gives you more control and can lead to higher payouts.
For popunder traffic, the best options are usually SOI (Single Opt-In, CPL). They have the simplest flow, a short registration, and often bring a high conversion rate. Later, once you see stable results, you can try DOI or CPA offers.
When choosing an offer in CrakRevenue, check:
- Promotion method: must allow Popunder.
- Flow: SOI if you are just starting.
- Pick offers with EPC higher than average.
- GEO and device: make sure they match your traffic source setup.
- Landing page: optimized for desktop or mobile, depending on your campaign.
3. Preparing the link, campaign and postback
Once you’ve picked your offer, you need to set up tracking. This way, you’ll clearly see which placements perform best and bring conversions, and optimize your campaigns based on clear data.
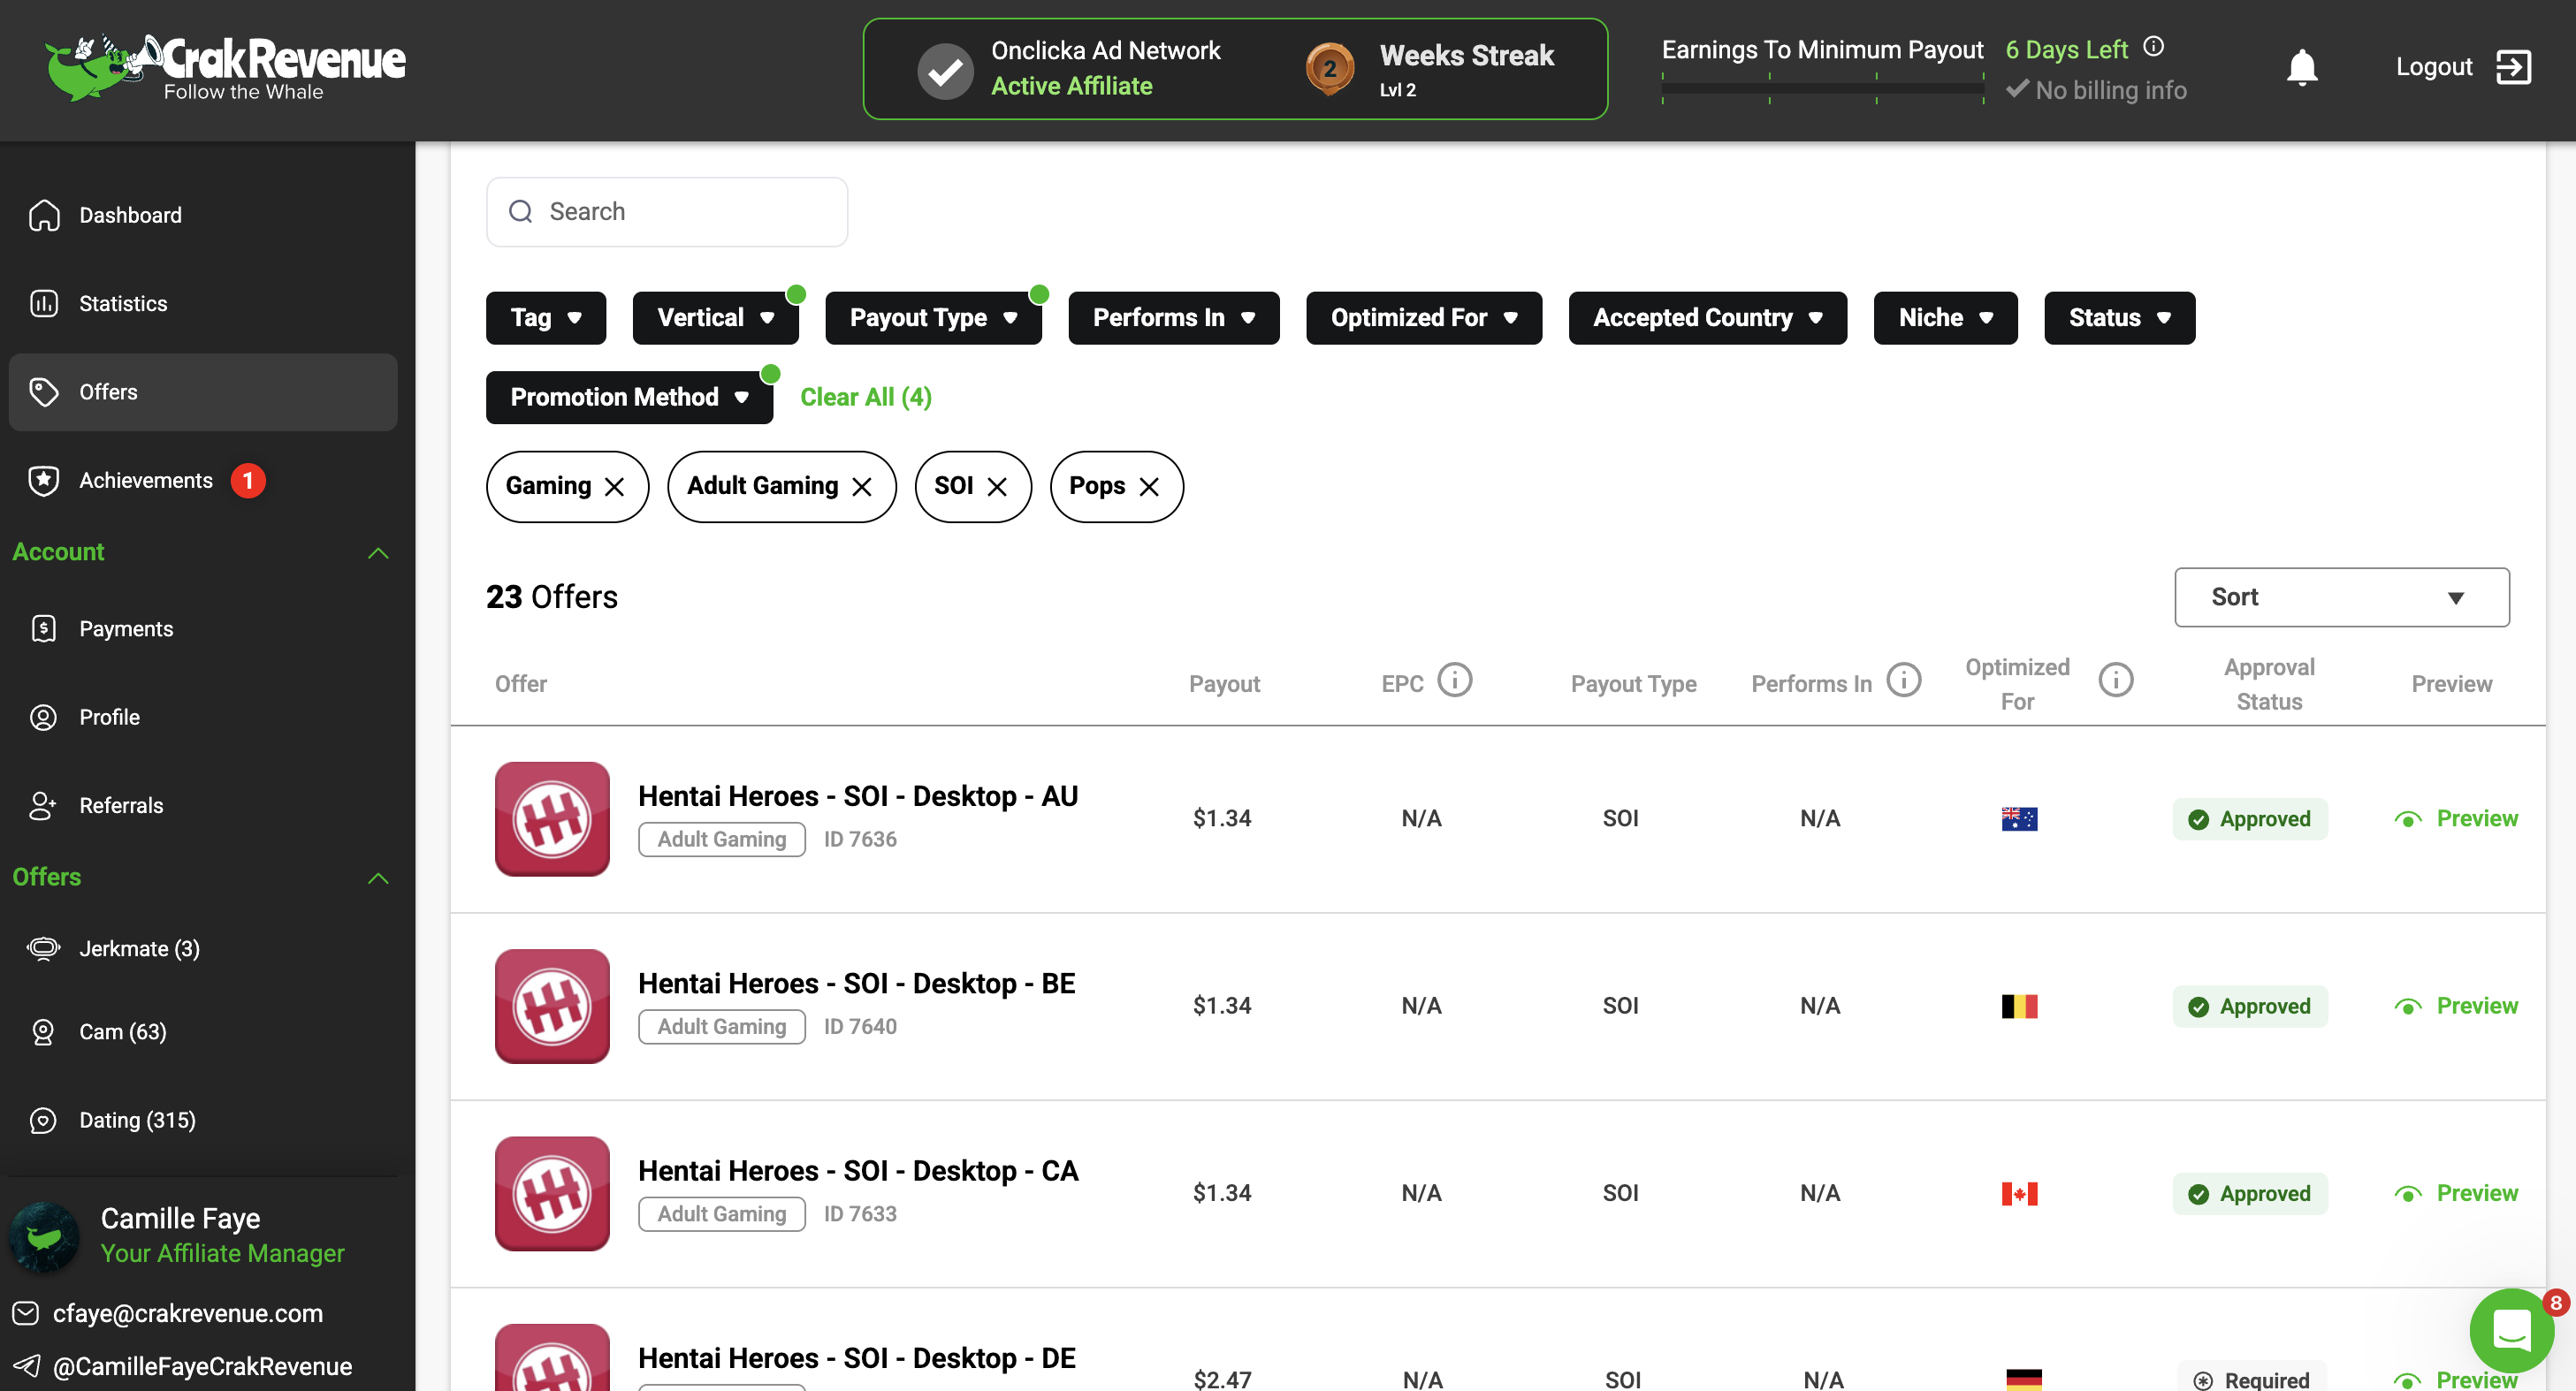
CrakRevenue link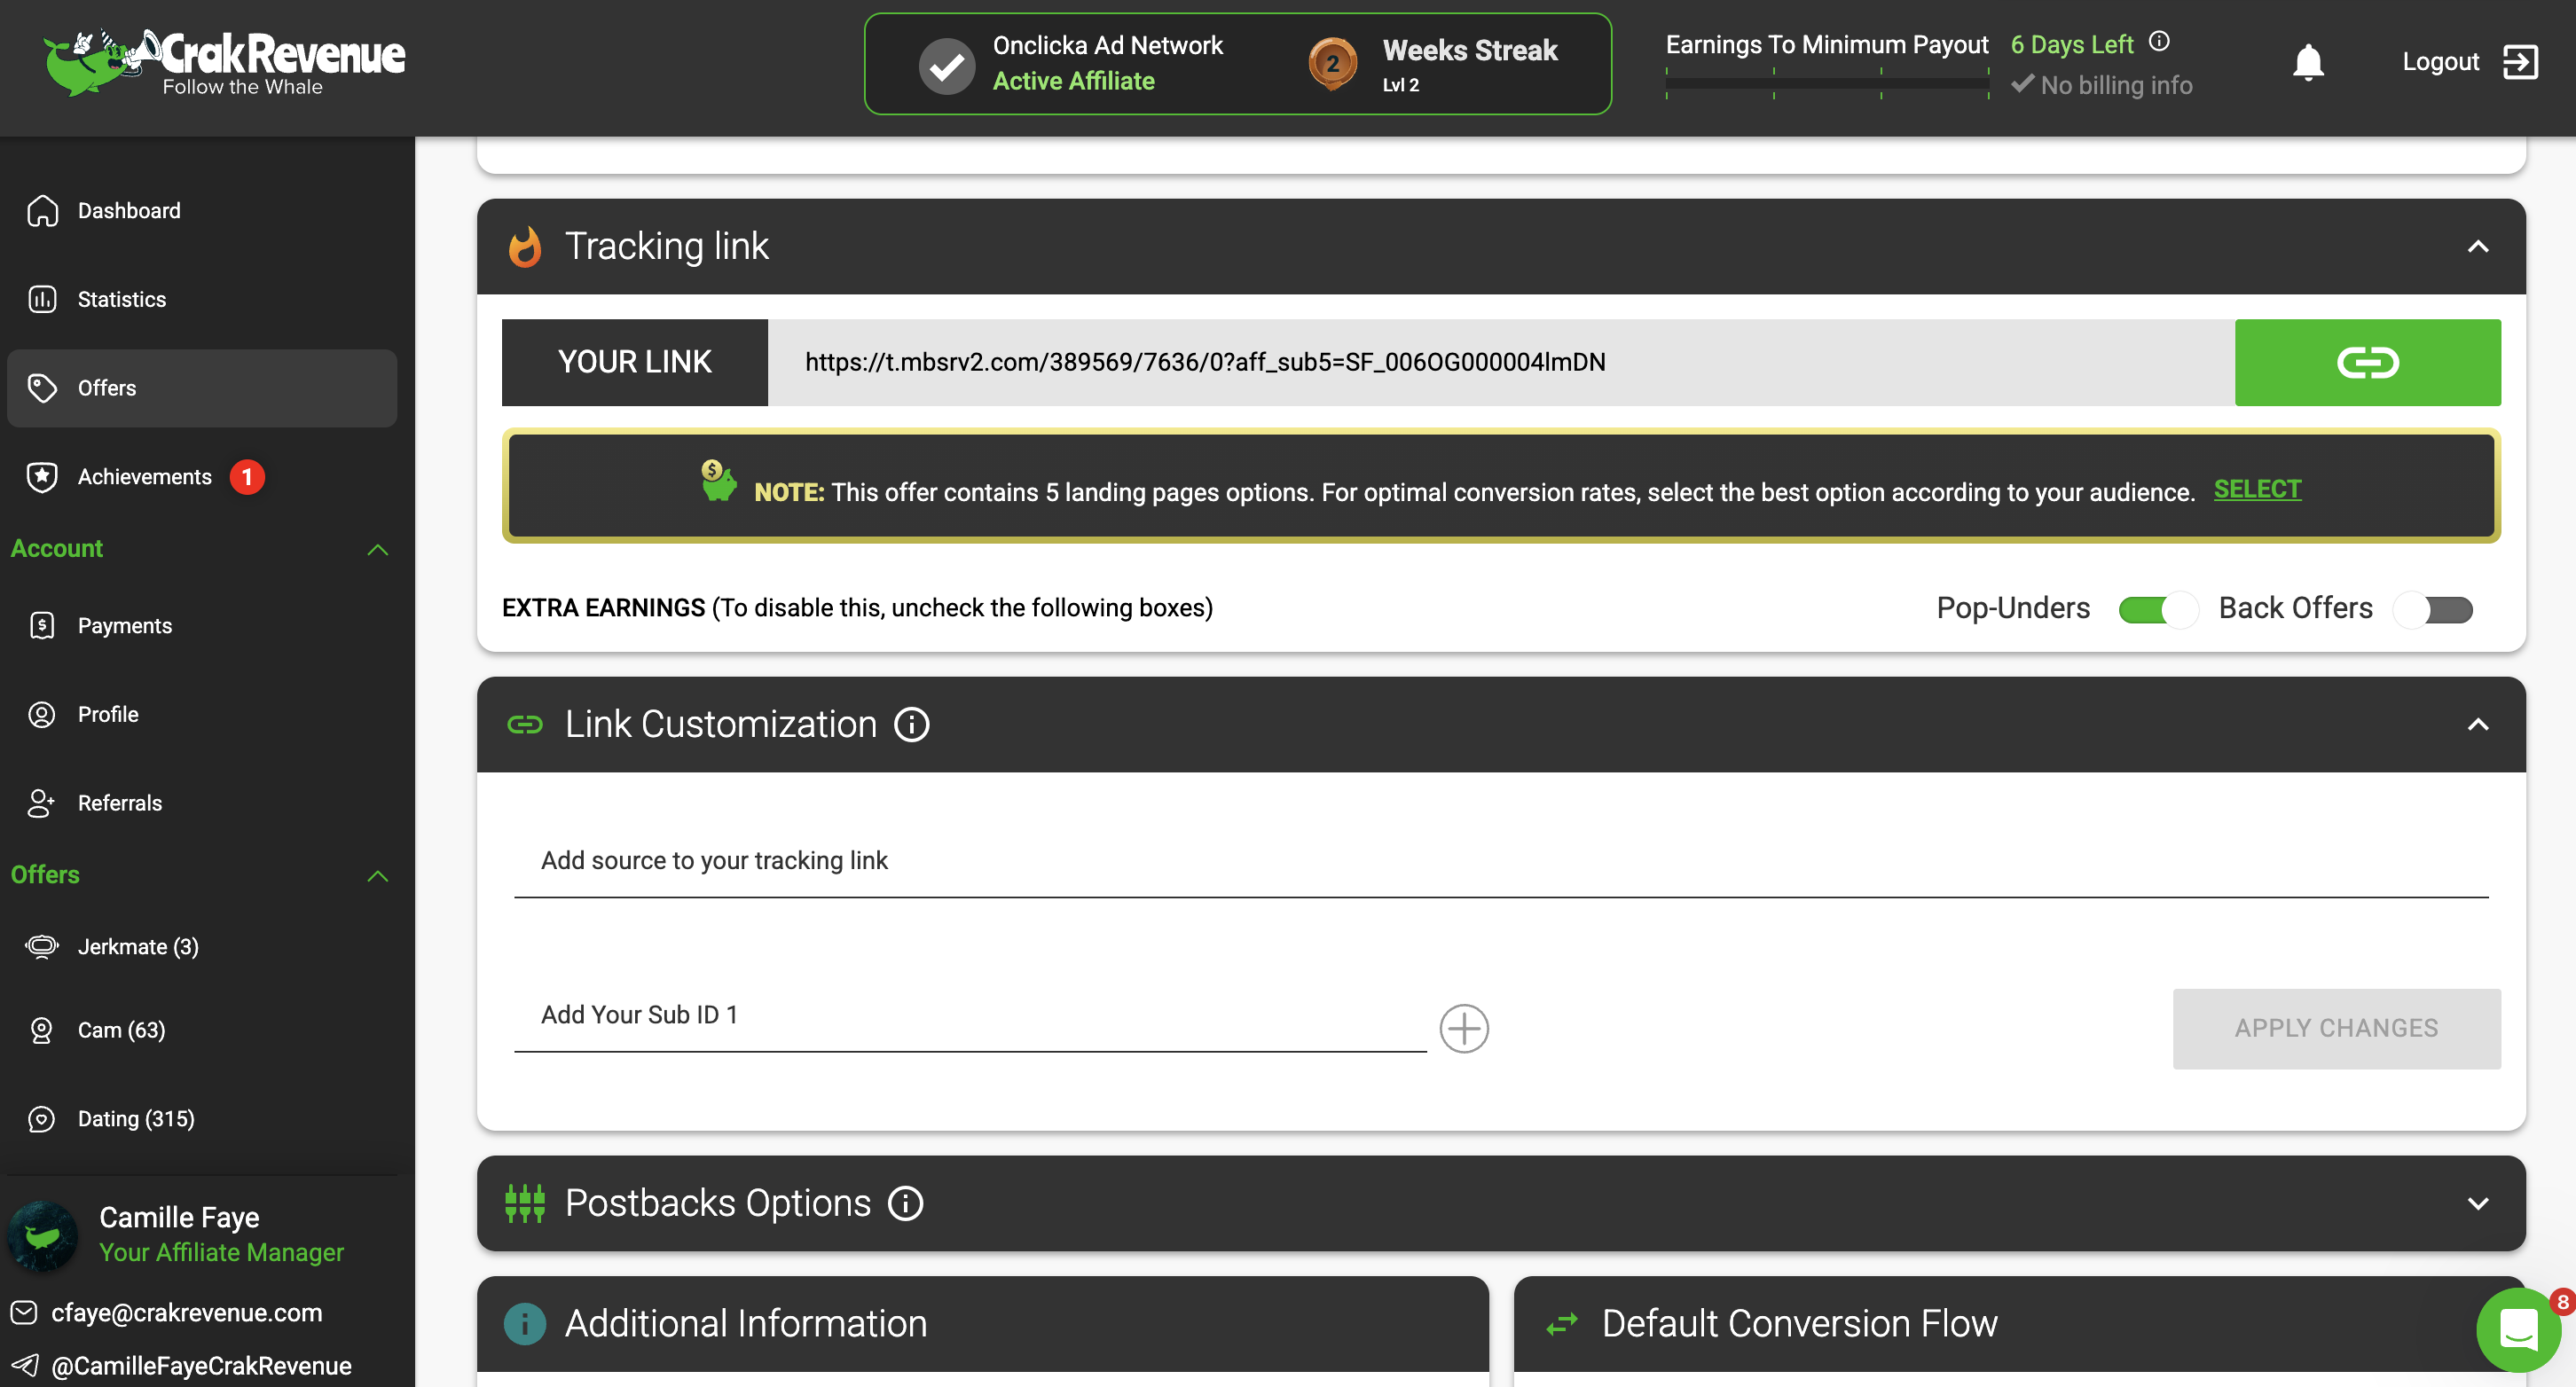 Every link in CrakRevenue can carry extra parameters. Always add a SubID for the click ID, like this:
&aff_sub={click_id}
CrakRevenue gives you several SubID fields (aff_sub1–5). You can use them to pass more data such as campaign name, GEO, or device type. This way you’ll be able to break down results later and see what really works. If you want to read the full guide on how to setup your own postback, check it out here.
Once you have your link, go to your OnClickA dashboard and click Create campaign.
- Choose the Popunder format.
- Select CPM as your pricing model.
Click Create Ad, give your creative a name, and paste your CrakRevenue offer link into the URL field.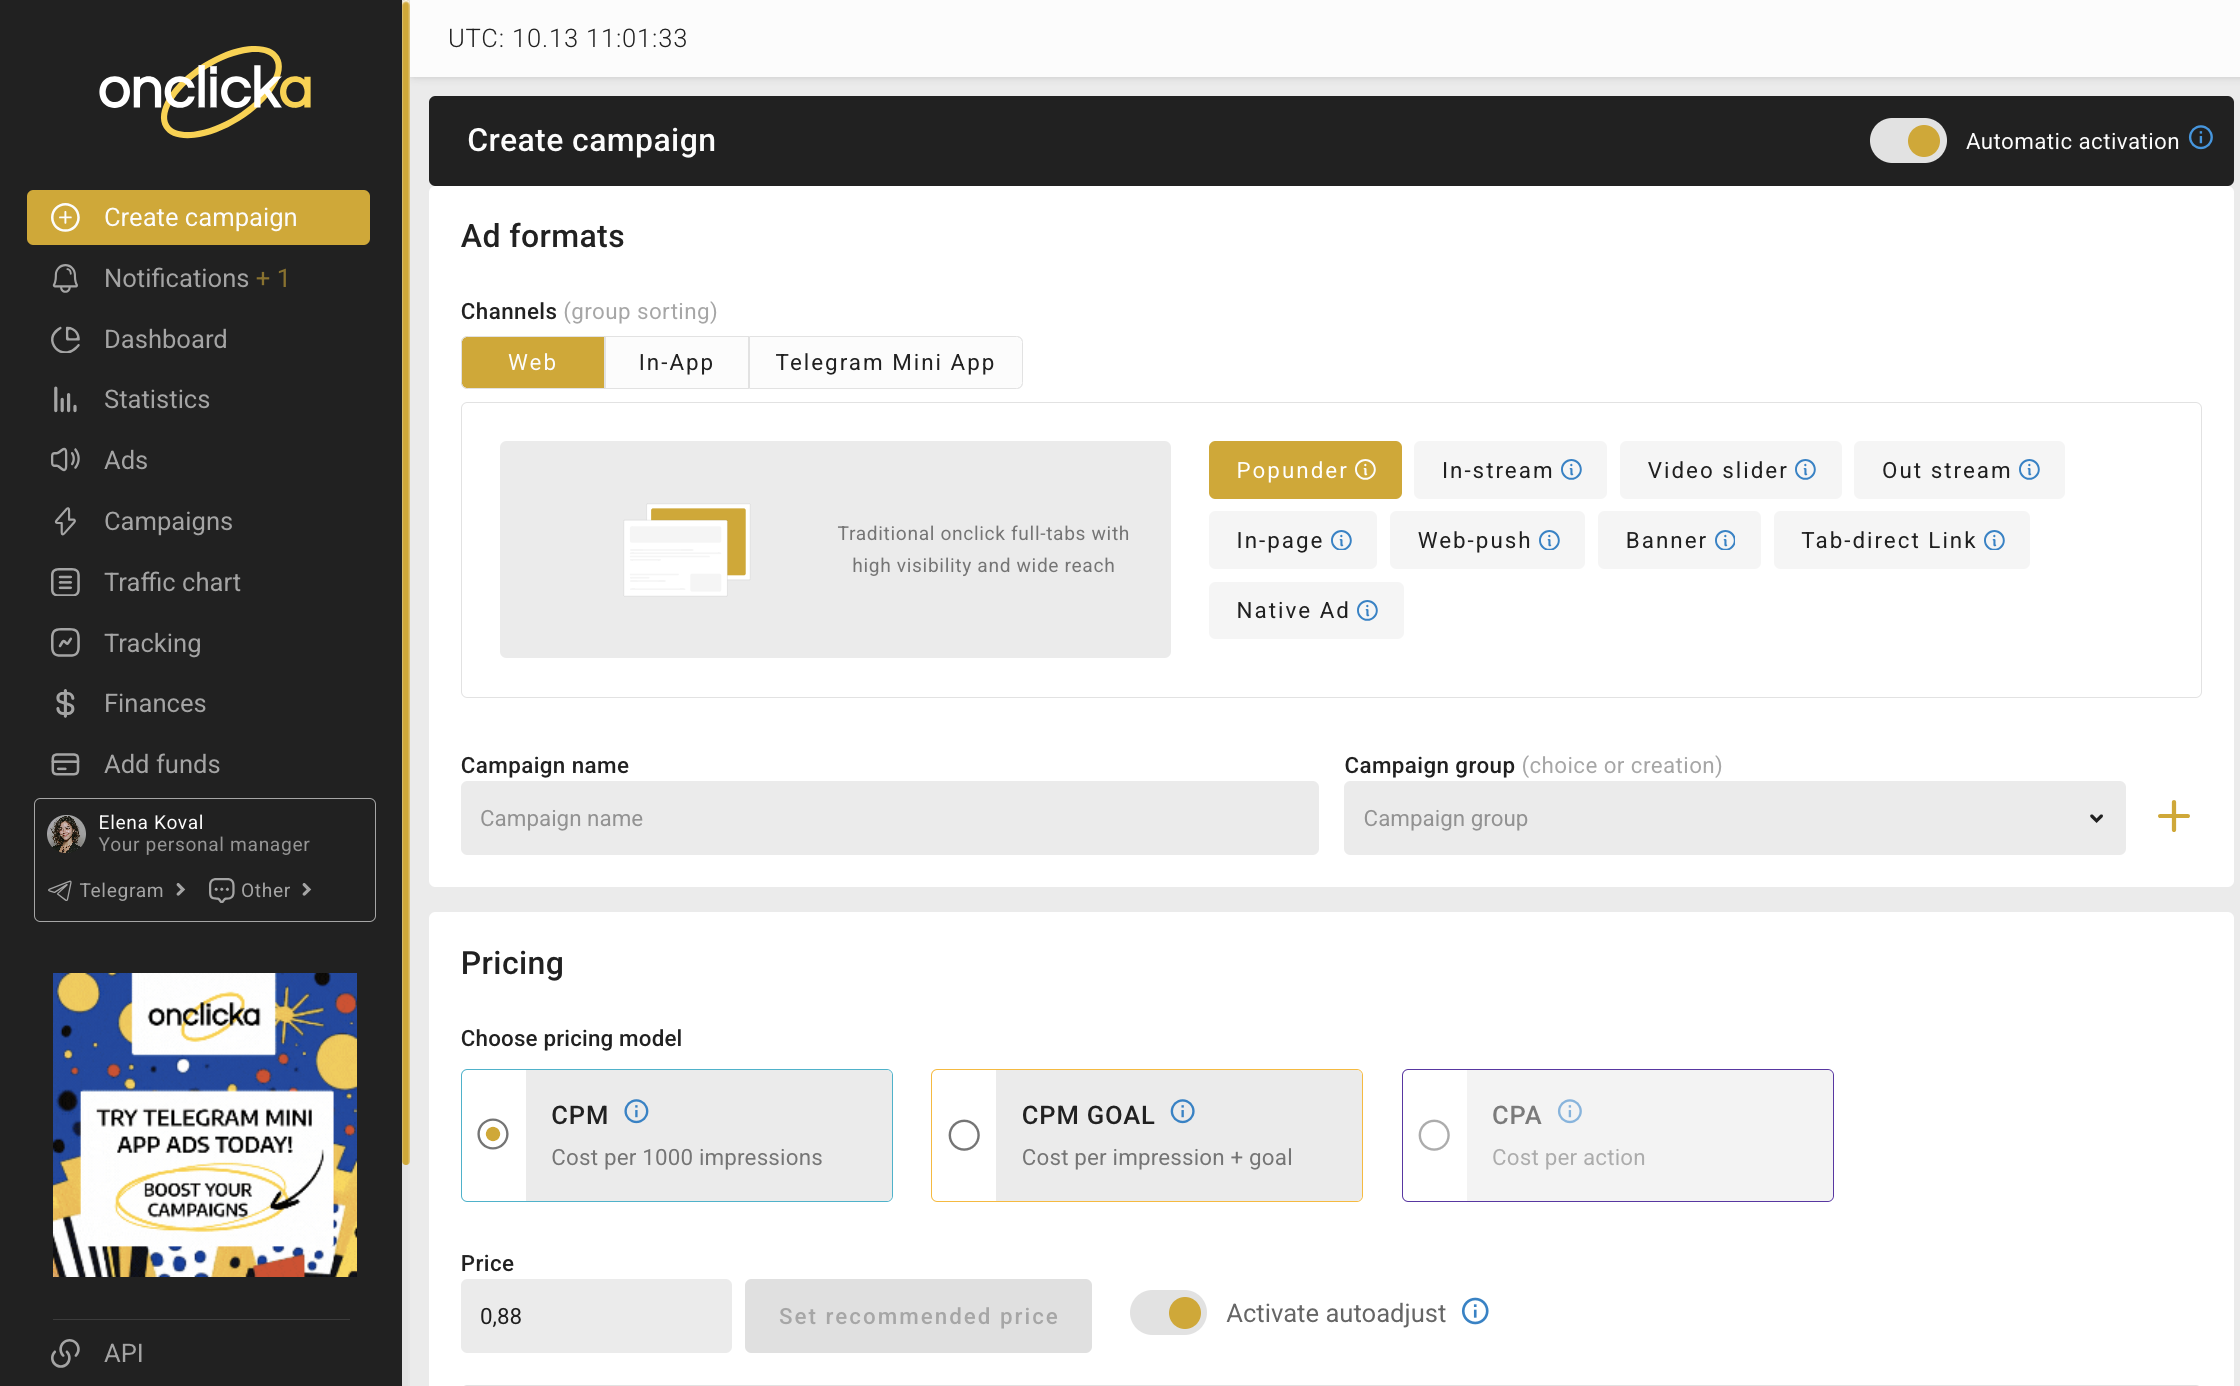
Adding tokens in OnClickA
When you paste your CrakRevenue link into OnClickA, don’t forget to add tokens (macros). These tokens pass key data from OnClickA into CrakRevenue, so later you can see where each conversion came from.
Postback setup
Now connect your conversions back to OnClickA or to your tracker. In CrakRevenue, go to Postbacks and insert the S2S URL from OnClickA or from your tracker.
In OnClickA, copy your Postback URL from the Tracking section. It looks like this:
Test your setup using the Conversion Test option in Onclicka to make sure tracking works correctly.
4. Campaign setup in OnClickA (Popunder)
With your offer link and postback ready, you can finally launch a campaign in OnClickA. Popunder is a straightforward format, but the small details in your setup will decide how well it performs.
1.General settings
Once you’ve chosen the Popunder format, pasted the URL and assigned tokens, you can give the campaign a name that makes sense — something like CR_Smartlink_US_Mobile_Pop. It helps later when you’re running several campaigns at once.
2.Pricing
Choose the CPM pricing model and start with the recommended bid you’ll see in the dashboard.
If you want to grab more volume, you can raise it a little. Adding 5–10% is usually enough. To make things easier, keep the auto-adjust option ON. The system will handle small bid changes to keep your campaign competitive.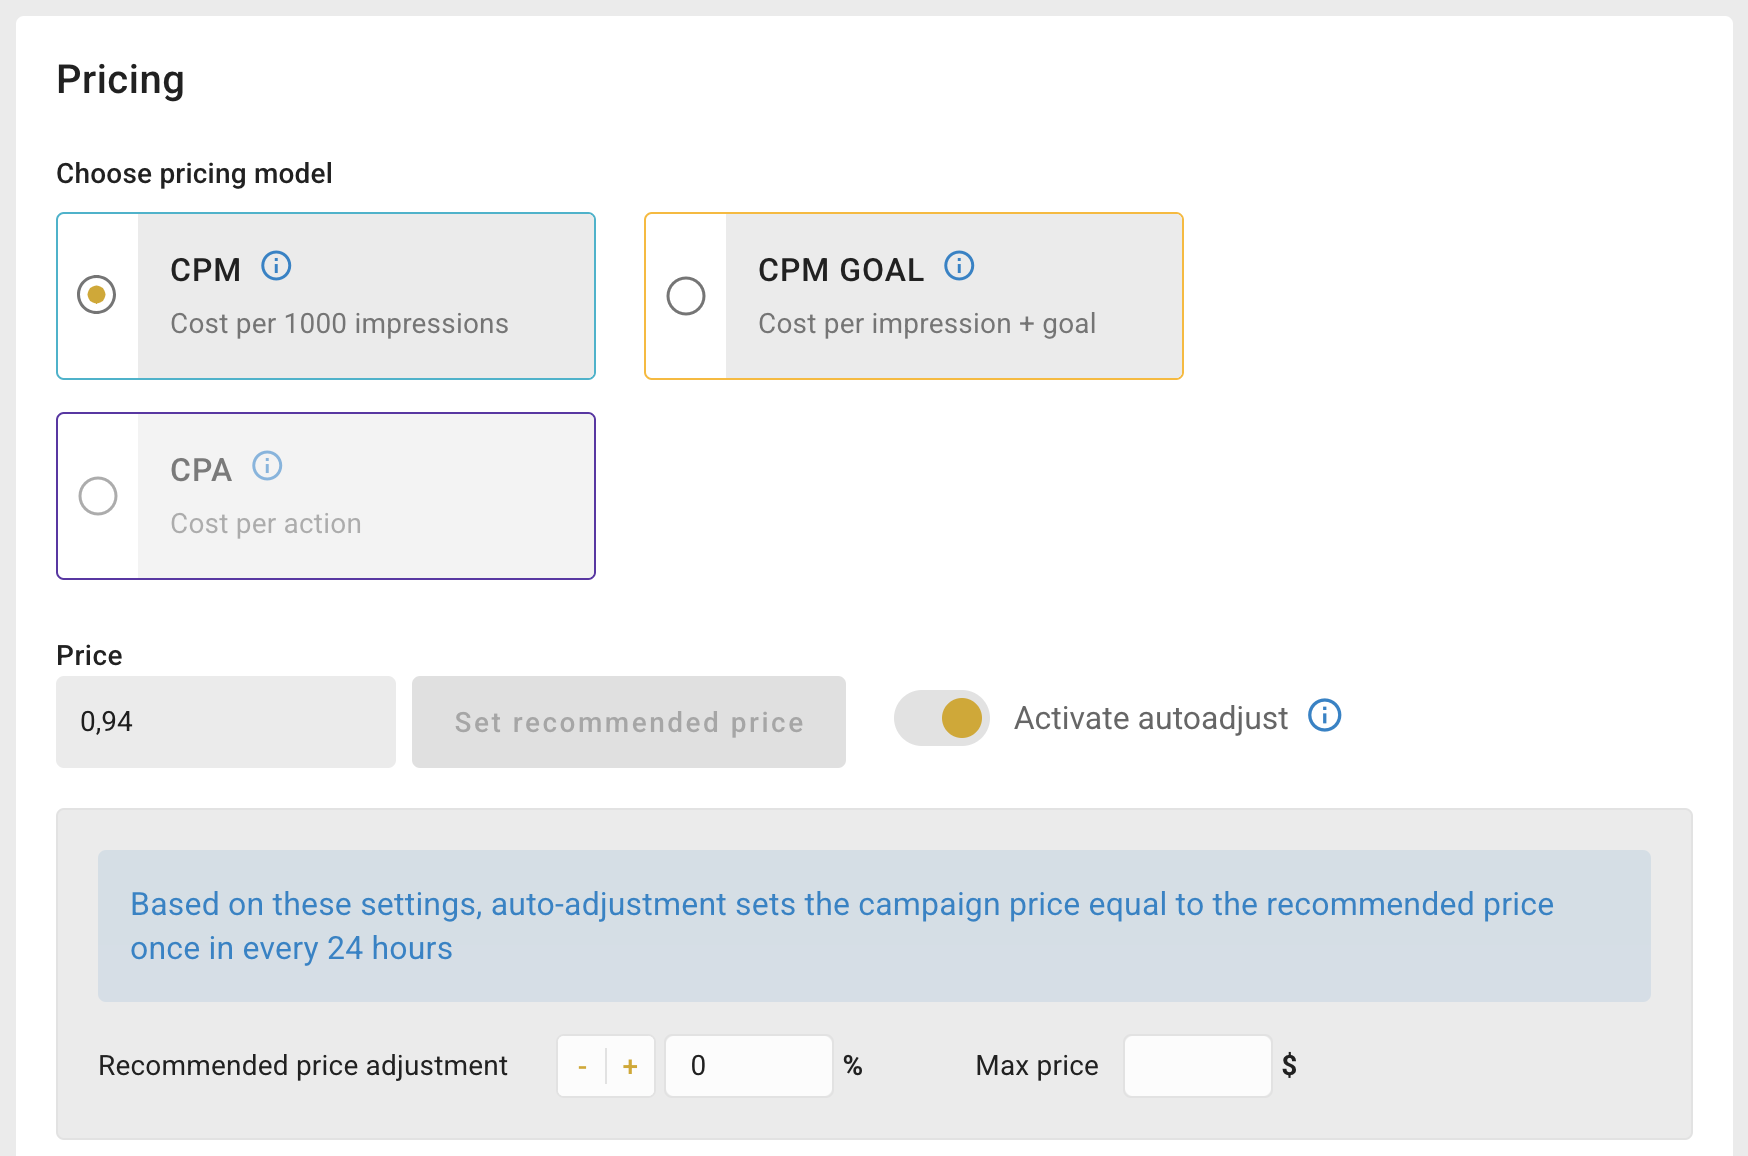
3.Creative
You don’t really need creatives for popunder. Just paste your CrakRevenue link with the {click_id} token inside. If you want to test more than one landing page, add several URLs. You can set a higher priority for the one you think will work best, while the others will get some share of traffic for testing.
4.Categories
Choose the category that matches your offer best. This way your campaign will get the right traffic source and perform more effectively.
5.Traffic type
You can start with the full network volume (All traffic) to gather initial data. Later, you can also try High Quality, Premium, or Search Traffic (which includes traffic from search engines). Keep each type in a separate campaign to measure performance more clearly.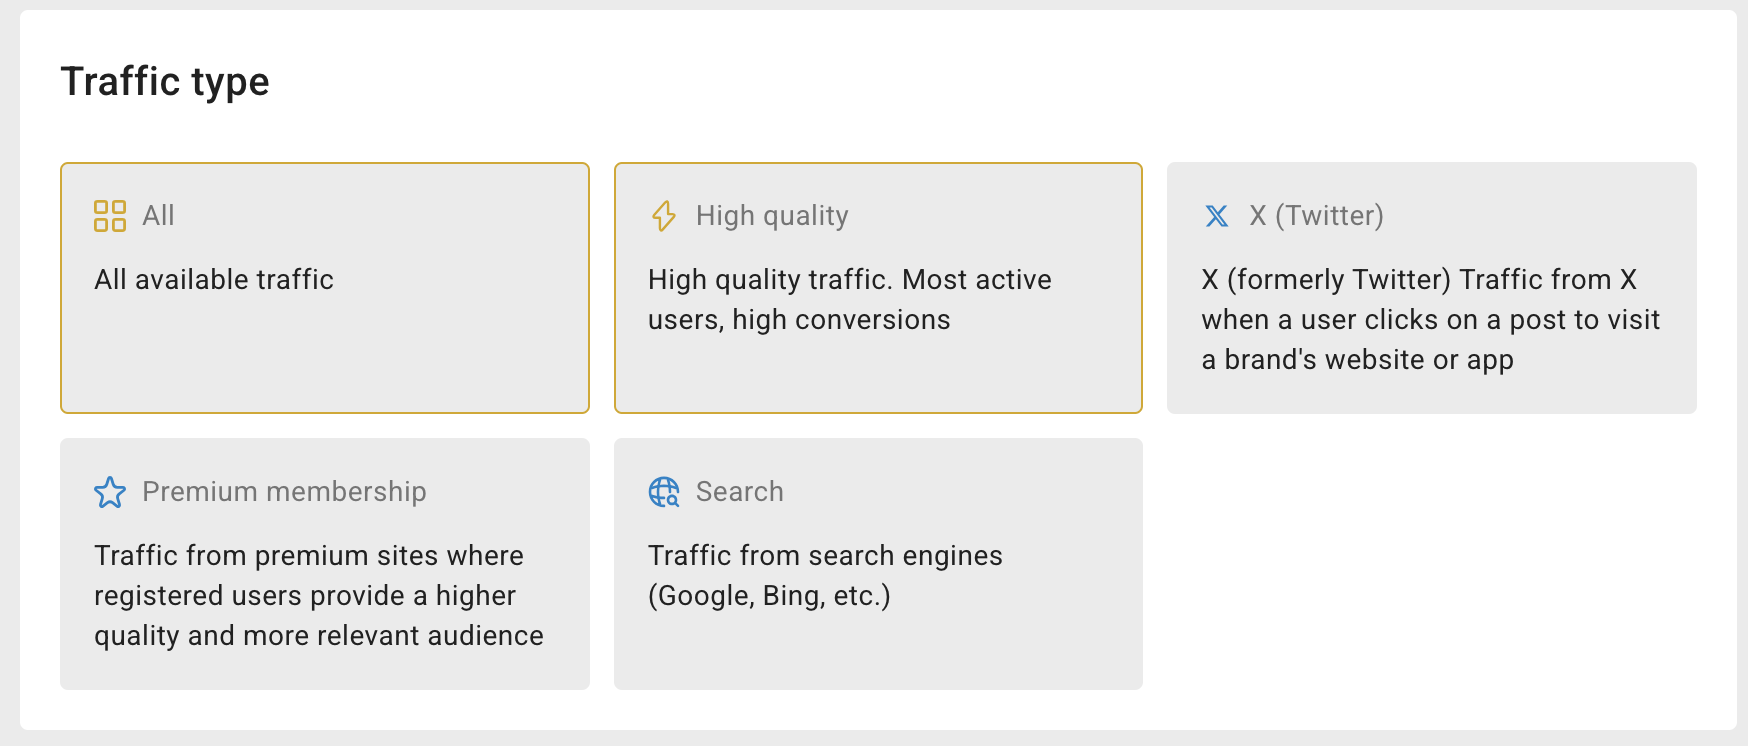
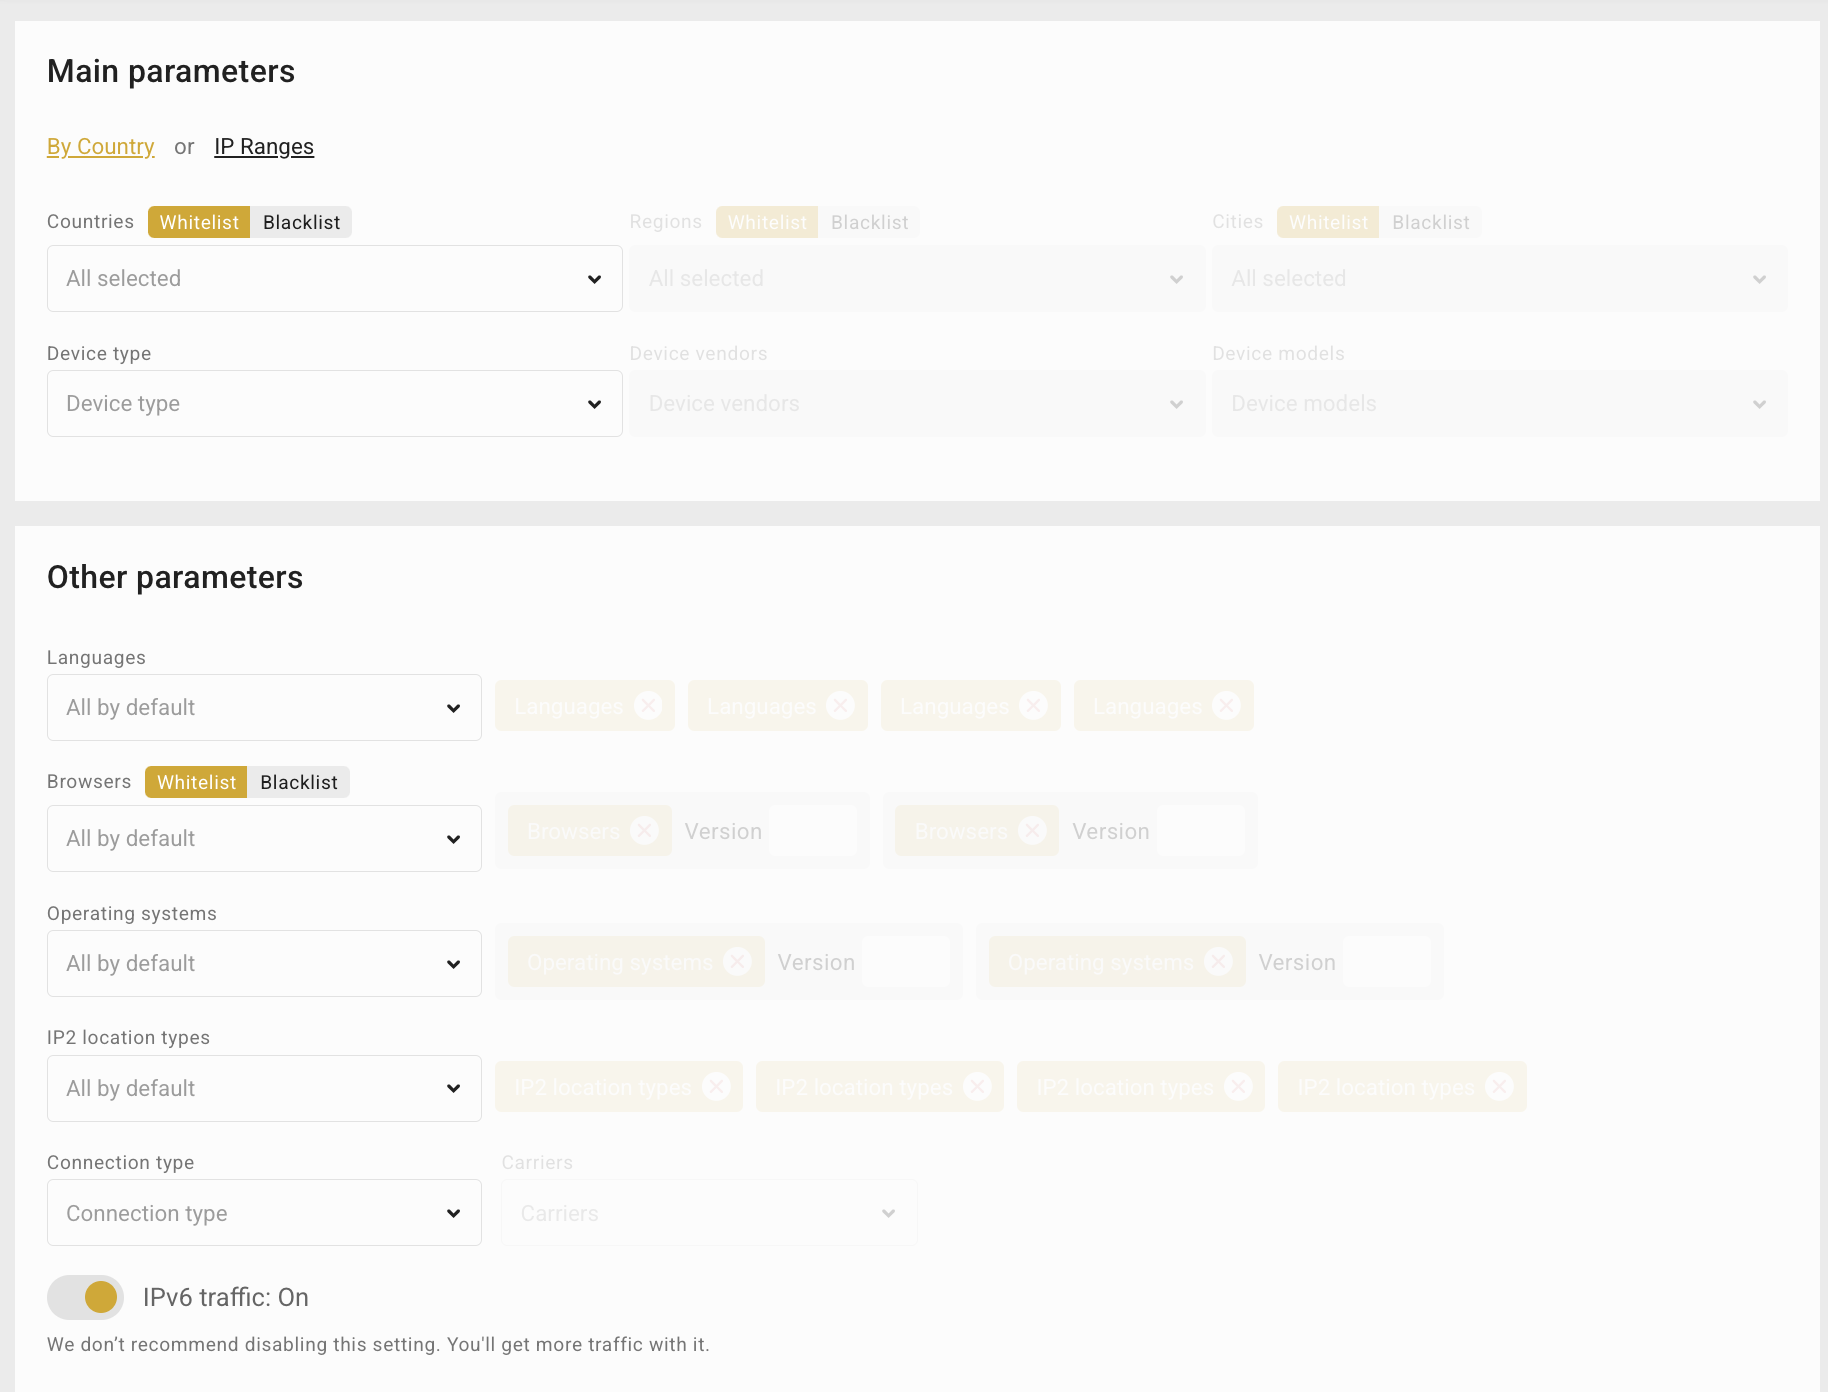
6.Targeting
- GEO: only include countries allowed in the offer rules — otherwise conversions won’t count
- Device: in some cases it’s a good idea to split Desktop and Mobile into separate campaigns, since they usually perform differently
- Language: leave default if the landing page works in multiple languages
- IPv6: no need to switch it off — leave it enabled
7.Sources
At the start, run on RON (all spots). This gives you the widest coverage and enough data to judge performance. Keep the spots that bring results by adding them to a Whitelist, and move the less effective ones to a Blacklist to focus your spend on the best-performing traffic.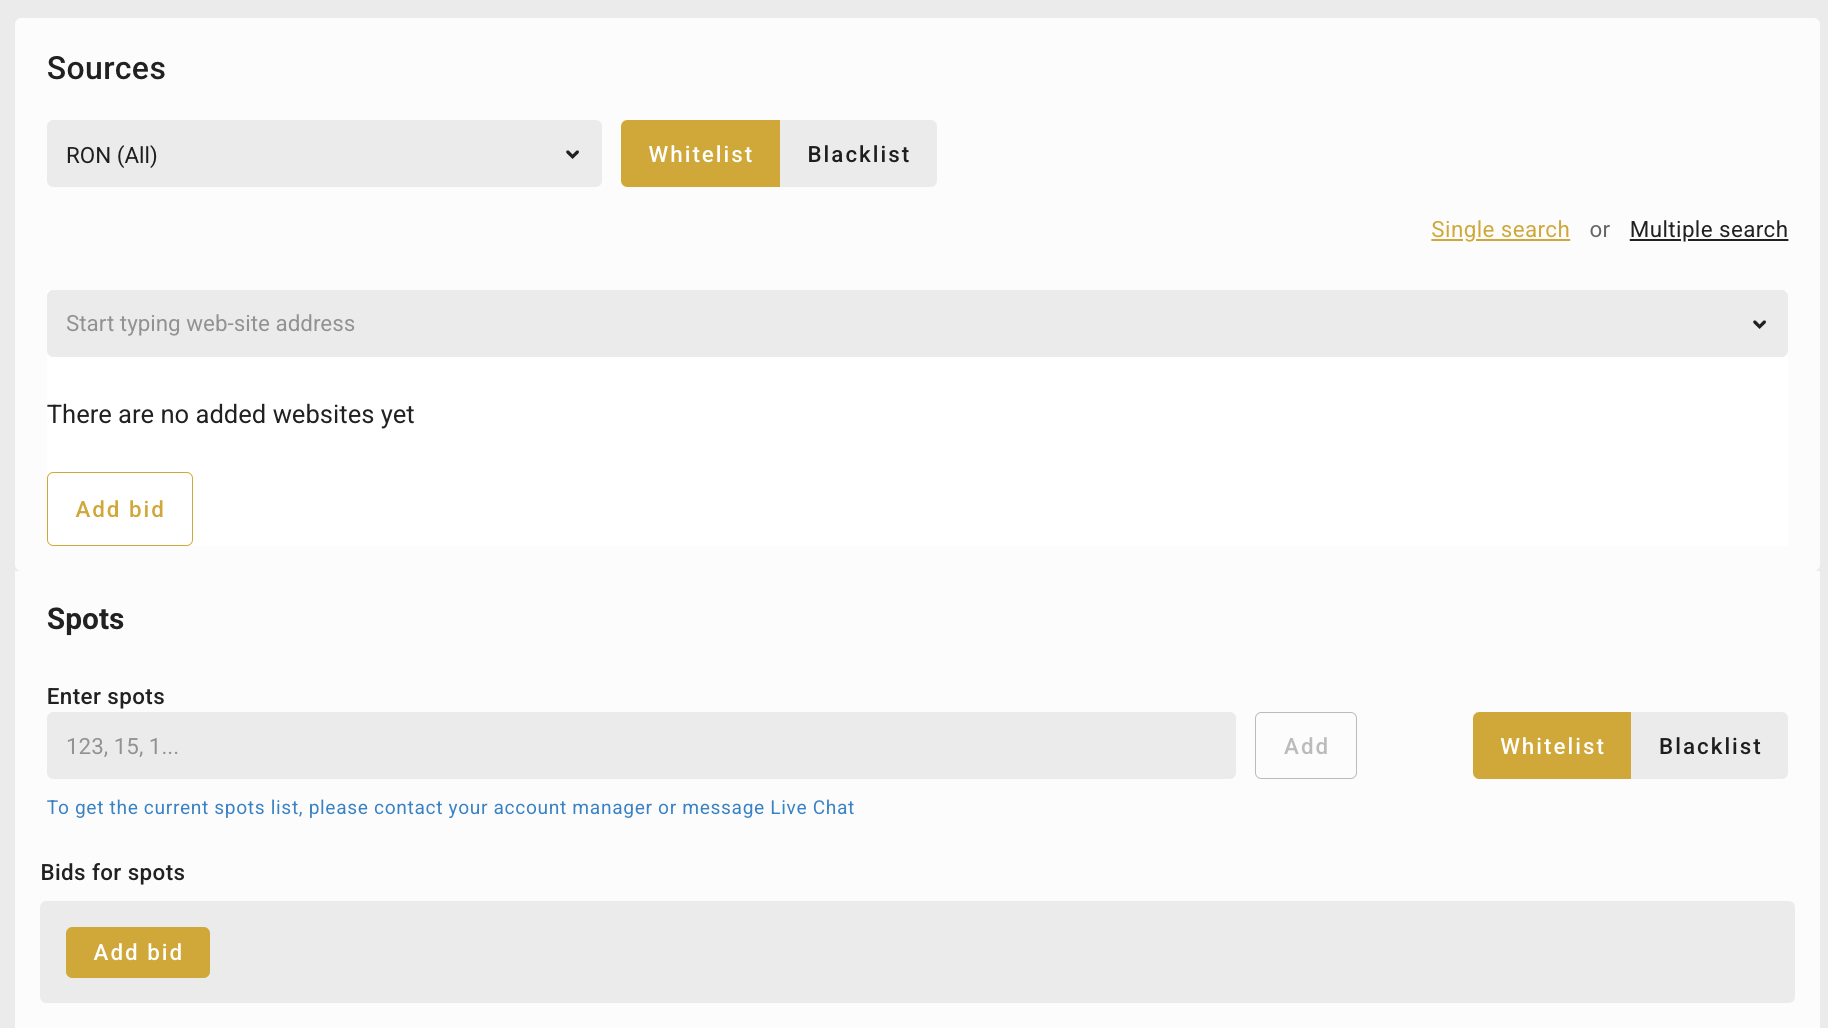
8.Limits
Set a daily budget between $20 and $50 per campaign. Add a frequency cap so you don’t show the popunder to the same user too often, 1/24 to 4/24 works well. As for impressions per minute, you can leave it unlimited unless you’re testing very aggressively and want to slow down the spend.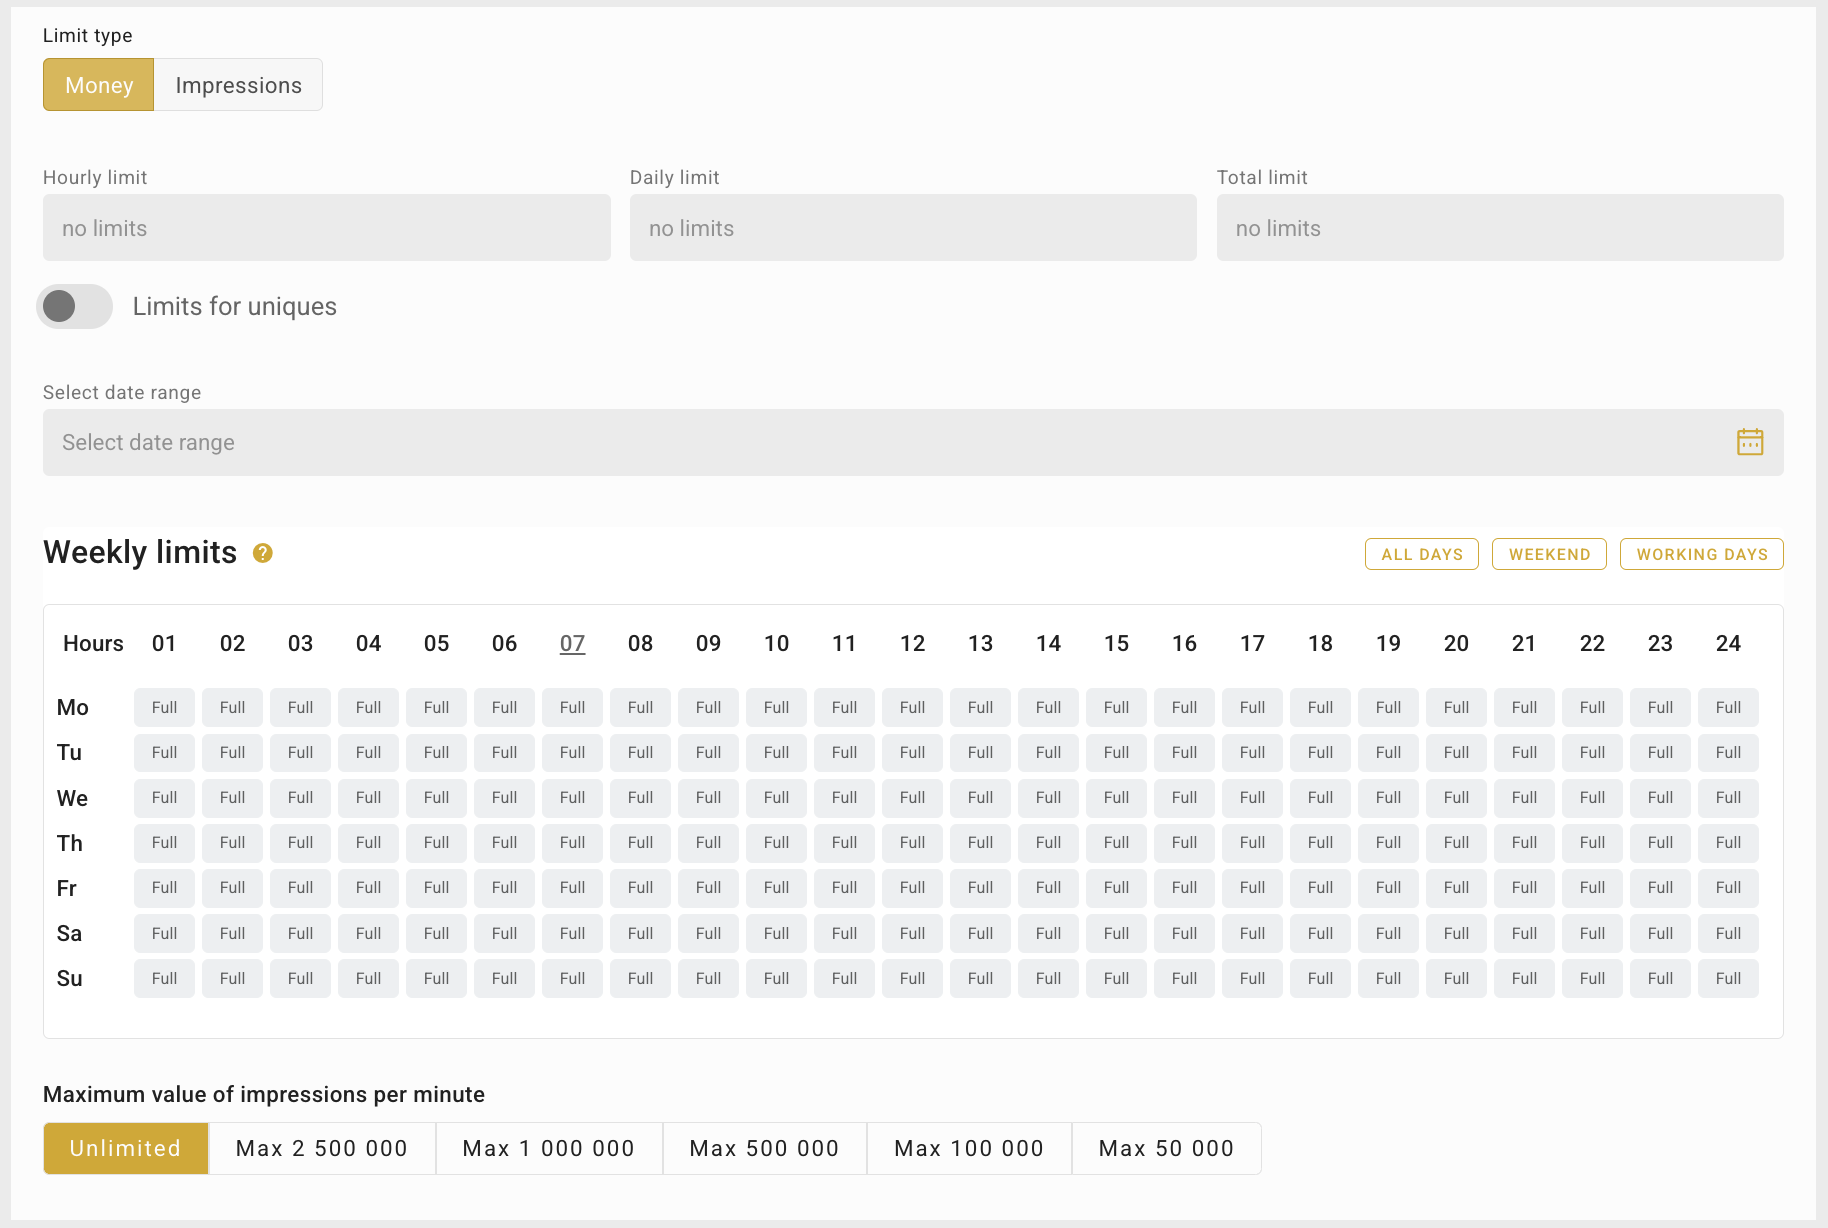
5. Checking results
After your campaign goes live, the next step is to keep an eye on the numbers. Tracking both sides (CrakRevenue and OnClickA) is important, because each shows you different details.
In CrakRevenue
Open the Statistics section, and head to the Reports section. Use filters like Offer, GEO, Device, or SubID to break down your results. The main metrics you want to look at are:
- Clicks — how many people came from your traffic source
- Conversions — how many of them completed the flow (SOI, DOI, etc.)
- EPC — earnings per click
- CR% — conversion rate, shows how well the landing page performs
- Revenue — your total earnings
Reports update every few minutes (about 5–15), so you don’t have to wait long to see if your test is moving in the right direction.
In OnClickA
Head to Statistics, then to Campaigns or Spots. This is where you can see which placements are actually driving the results.
Look at:
- Impressions and spend – how much traffic you bought
- Conversions and revenue – only shows if your postback is set
- ROI or profit – if you connected a tracker, this gives you the real bottom line
When you put the two sides together, you’ll see not just how much you made, but which GEOs, devices, or sites actually bring profit. That’s the data you’ll use in the next step.
6. Campaign optimization
The first days are all about testing and adjusting. Optimization is what separates a random test from a campaign that makes really good profit.
Day 1–2: first test
At the very start, keep it simple. Run just one GEO and one device so the data is clean and easy to read. Set a daily budget around 20–50 dollars and use the recommended bid from the system. The goal here isn’t to earn profit right away, it’s to gather data you can trust.
Day 2–3: cleaning up
Now look at the placements. If a spot has already spent more than 1.5× your target CPL and hasn’t given a single conversion, stop sending traffic there. Add it to your Blacklist.
On the other hand, if a spot is bringing leads at or below your target CPL, keep it and even raise the bid slightly so you get more volume. This is also the moment to start building a Whitelist with your best-performing sites.
Day 3–5: scaling
After you’ve filtered out traffic, it’s time to grow. Split Desktop and Mobile into separate campaigns so you can adjust bids more precisely. Test extra GEOs to see if they behave the same way. In CrakRevenue, A/B test a couple of different landing pages against each other to find the one with the highest CR.
What to keep an eye on:
- Effective CPL (Cost per Lead) – this is how much you actually pay for each conversion. Compare it with the payout you get from the offer. If your CPL is higher than the payout, you’re losing money. If it’s lower, you’re in profit.
- EPC (Earnings per Click) – shown inside CrakRevenue. It tells you how much each click is worth on average. If EPC is climbing, it means your traffic is getting stronger and your landers or GEOs are working. In this case keep sending traffic.
- ROI (Return on Investment) – the final profit margin after spend and revenue. Once ROI stays stable at around 20–30 percent or higher, you can safely raise your budgets and scale the campaign.
7. Withdrawing money from CrakRevenue
When your campaigns start generating profit, you’ll want to cash out. CrakRevenue offers several payout methods, each with different minimums.
- MassPay, Paxum, PayPal – minimum payout is 100 dollars.
- Bitcoin, Wire transfer – minimum payout is 500 dollars.
Payments are usually sent twice a month. In most cases it works on a Net30 basis, meaning you get paid for last month’s revenue at the end of this month. Go to the Payments section in your CrakRevenue dashboard to set up your preferred method and payment details.
8. Checklist before launch
Before you hit “start” on your first popunder campaign, make sure these basics are in place:
Offer settings in CrakRevenue – the offer must allow Popunder, and the flow should be SOI if you’re just starting. This keeps the funnel simple and increases your chances of getting conversions fast.
Tracking token in your link – the link should include aff_sub={click_id} so every click is tracked. Without this, you won’t know which spots actually bring results.
Postback connection – your postback must be set up between CrakRevenue and OnClickA (or your tracker). Run a test to confirm conversions are firing back. This step is crucial for optimization.
Conversion Test passed – double-check it inside OnClickA. If the test shows success, you can be confident real conversions will track.
Campaign format and pricing – in OnClickA, the campaign must be Popunder, CPM, with auto-adjust switched on. This ensures your bid stays competitive.
Frequency cap – set frequency capping at 1 impression per 24h (up to 4 if you want broader reach). This helps you control spend and avoid user fatigue.
Traffic type – begin with All traffic. It will give you space for tests and seeing what works.
Optimization plan – be ready to act on your results. Keep the placements that bring steady conversions, adjust targeting where needed, and test separate campaigns for different GEOs or devices to improve consistency.
Final thoughts
The process is straightforward: pick the right offer in CrakRevenue, connect your tracking, and launch campaigns in OnClickA with a clean setup. From there, it’s just a matter of watching the numbers and adjusting as you go.
If you want to try it yourself, check the offers and start a test campaign today: